

Blocking out level - Week 7 - Week 10 - 29/04 to 13/05
- Miles Carr
- Dec 26, 2018
- 9 min read
Updated: Jun 18, 2019
Today (29th) I begin blocking out. To start the process, I chose the "ThirdPerson Level Template". I am doing a First Person game, however, there are some tricks and settings I can do to make it into a "True" FPS experience. This means looking down and seeing the players body, and the players animation moving with the camera.
I want to get all the coding done first so It gives me a better chance of completing at least a decent build of the game that is somewhat playable.
The Process of making a "True" FPS camera...
First of all, I need to go to the settings of the Third Person player so I can start changing the camera around. To do this, I went into the World Explorer on the right hand side of the software window, scrolled down until I see the Third Person node, and clicked the edit button.

Once I clicked "Edit ThirdPersonCharacter" I was greeted with this window:

As you can see, we have the base player and the camera. Now this could be as easy as dragging the camera in the players head, and this could work, but that means that when I turn the camera or move about, the body of the character is static and doesn't move with the camera. I need to apply a few settings to make this happen.

These are all the built in components to the character. Originally, the "Follow Camera" was placed in "CameraBoom". This meant it was coded and scripted to pan around the player. I went ahead and dragged the "FollowCamera" into "Mesh (Inherited), this means that the camera is physically attached to the player and will be unable to pan around the player smoothly. But, now that it is attached to the camera, I can lock it to any bone in the players skeleton. The player is built up of skeletons like a normal human body, but labelled differently. Before I snap the camera to the players head, I first of all need to drag the camera in a appropriate position in the head.

And I can now snap the camera on the players head which means the camera will not clip inside the model.

This will reset the cameras position, which means I need to re-position it back in the players head. Back at the components section, I need to apply a few settings which will make the camera run smoothly and let us look around whilst the model is fixed to the camera.


With these settings now applied, all I have to do is click the "Compile" button and it should work. If the "Compile" logo has a tick, this means the settings are running as they should, if they have a stop sign, it means something is either imported wrong or something is clashing in the script. But, thankfully, I have got a tick.

This is the result, which was better than what I expected. I had the idea that you wouldn't see the body that much due to my camera placement, but it turned out well.

I wanted the player to see their body when looking down so the player knows that there is more to them than a camera and basic controls. This also helps me demonstrate the fact that I am willing to adapt to further ideas from my previous project.
CRASH ON UE4 - UNKNOWN CAUSE

Not too sure what caused this crash, it was very random. I thought maybe it was the settings I applied for my First Person Camera, but everything was done correctly and as intended. So far I have not experienced another crash, but I expect them to occur more as I progress.
I deleted the default ThirdPerson level and started to create my own. I have started to create the base structure of the map. I have 3 brushes named differently, attached together to make the map whole. I have "Main Map", "Cave Entrance" and "Cliff Area". I added a terrain underneath the floating map as I intend to build up a mountain underneath, to give the player an illusion of being very high up.

On this image, there is a block on the right sticking out towards the camera. That is going to be the cliff that ends the game. I plan to have functions and blueprints that will trigger the end game when they get to the cliff. I need to make it look like a cliff, so instead of downloading a cliff model, I can just form the block into my own cliff. There was an issue I thought about when starting on this process, being that the materials mapping will be very off when applied to the cliff due to all the different shapes, but considering its made of rock and stone, I hope that it will look natural to the terrain, and if all fails, I can always cover the texture only a little bit with some foliage.

I'm not going to worry too much about how it looks underneath as the player won't see it anyway, so I would rather focus my efforts on the next task then making the bottom of the cliff look fancy. Made some more adjustments to the base of the cliff to make it look bumpy and broken.

More Coding
I want to try and get all the coding related jobs out of the way at the start. I did this because I can test if mechanics work before going further into development. If I find out at the end that the player can't zoom in on the notes, that would be a problem as the game is around reading and exploring/discovering a story. I also wanted to make sure that the player could both walk and run, this is mainly for entering buildings, so that the player can walk around the building instead of running around and struggling to get past objects at a smooth speed.
The zoom in for the camera was slightly complicated, but I managed to get there in the end bug free with 0 crashes. Here is what the final setup looks like and I will then show the blueprints.

I made a "Dev Test" area so I could keep my tests in one place and not on the map itself.
As you can see, we have a big cube, representing a tree, a small block inside the "tree" representing the note, and a camera facing it making sure it captures the cubes face in full. We also have a trigger and a 2D/3D text to tell the player how to access the trigger, in this case, I would like them to press E. The reason that I have chosen "E" out of all keys is that this button is commonly used in video games as the use key.
Here is the blueprint:

So, at the start (left on the image) we have the trigger call outs. On trigger enter and on trigger leave. We also have a E function which is the key that the player has to press to activate the code ahead. The gate lets us involve triggers in the code, so the "Enter" bind is what key I want to press, and the open and close are the triggers. When the player touches the trigger and stays there, it opens the gate to the following code, when the player leaves, and as soon as no player is detected, it immediately triggers and closes the gate. Next to the gate, we have a "Flip Flop" which is basically a On and Off switch. This controls the E key, so when we press E, we turn the FlipFlop on, when we press E again whilst in the trigger, it turns it off. Next, all I had to do was make sure it goes to the correct camera when it turns off, then back to the player camera when it turns off.
I then realized that the player isn't going to know what key to press when they get in front of the note, nor are they going to know if they are in range to read the note, so I have to create something called a Widget which is essentially a on screen HUD/UI.
I created a new Widget in the content browser, and made this simple UI:

I then had to make it so that when they enter the trigger, the UI appears and gets called in and out of scene. This depends on the player being in or out of the trigger zone.

This blue prints picks up on where the player is, uses a custom variable called "Widget Visible", then uses the branch to determine its location on the screen and whether it shows or not.
I created another on screen widget which will need to be coded later on through the static mesh phase. This collected the amount of notes the player has in a progression bar. I also created a map feature. I have attached a static camera high in the air facing down in birds eye view. With the camera, the player is able to see all of their surroundings in a wide space.

With the main code completed and done, I can now focus my efforts on finishing the blocking out phase. As stated before, I wanted to build a mountain around the main play area as this makes it easier to model the hill without any terrain issues it may cause in the final build.

I have also gone ahead to refine the edges of the play area to make it more natural, along with this, I made the waterfall hill and a river at the bottom that it flows to.

This was part of the planning phase, that I assured there was some form of big skybox area beyond the play area, because a big part of the game was to have this natural environment surrounding the player.


Looking in the player collision filter within the editor, helps me look at the mold of the mountain and to make it look as natural as it can be. In my plans and intentions, I wanted a cave that contained a room as part of the note collecting that the player is required to do. I have gone ahead to create this big mountain which makes the player look small in the play area. That was the idea, as the skybox is going to be surrounded by mountain meshes as part of the planning.

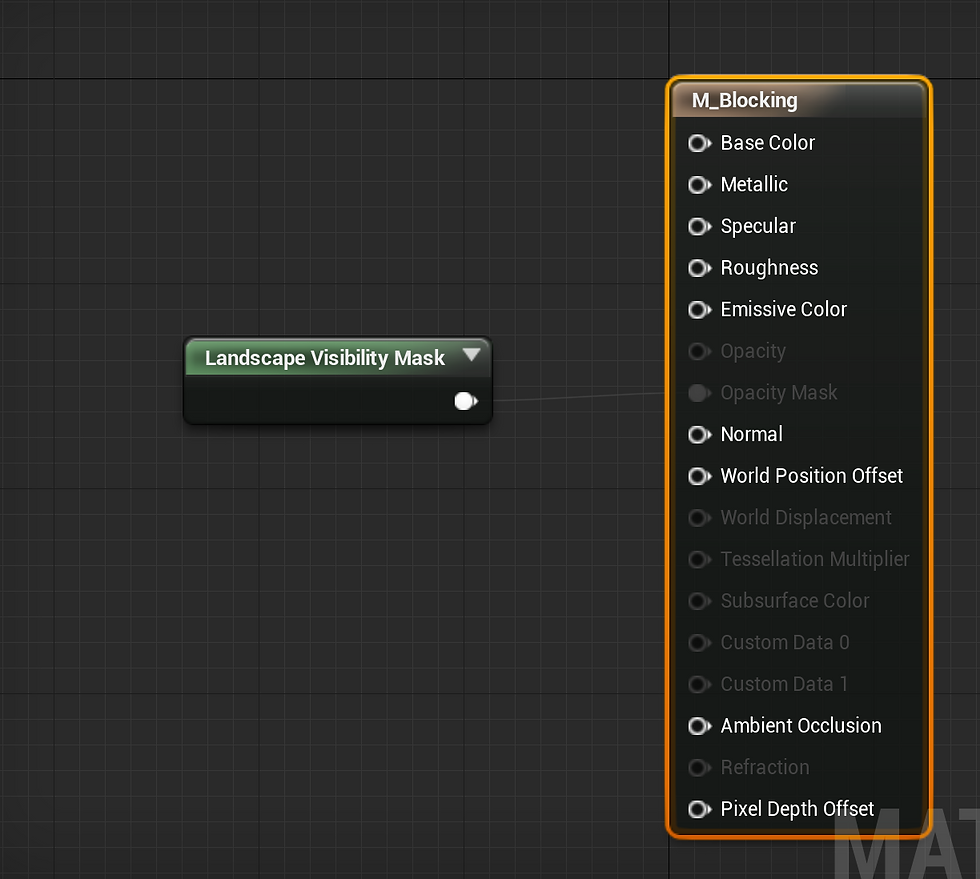
The next thing to tackle is to make the cave the player is required to go into for a note and for story purposes. In order to do this, I will need to make a material that doesn't contain any textures, but a setting. This setting is an Visible Mask Property for Landscapes. This lets me use the visibility brush on the terrain to cut into it, essentially making a cave entrance or to make a low poly river. I started by making my Material, then going into the editor. Once I was in the editor, I spawned in the Visibility Node for the material, attached it to the opacity setting and it was then ready to use on the mountain. However, this does turn the landscape black, but this is only temporary as I will change materials once I'm in the next phase.


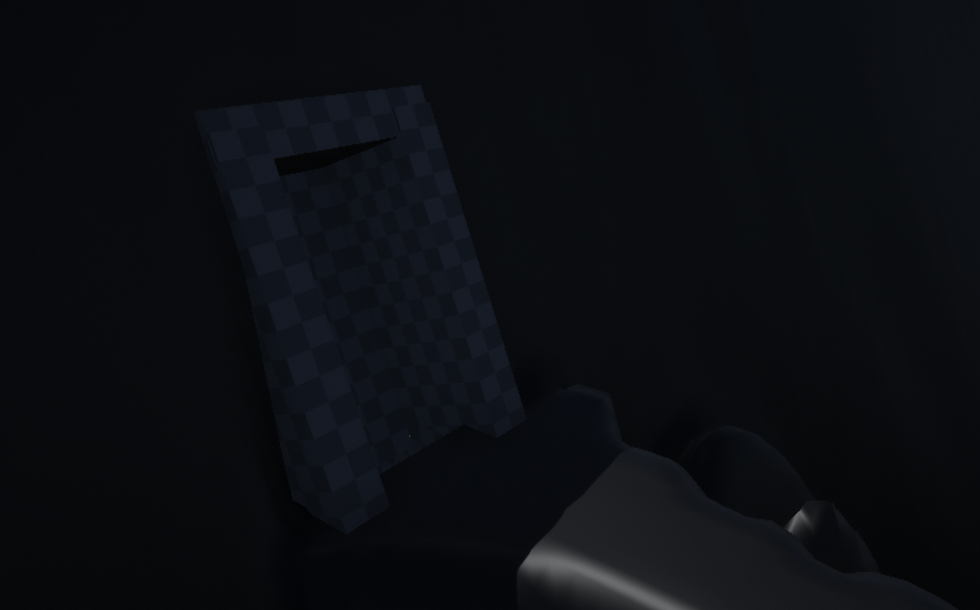
As you can see from this image, Using the Visibility tool, I have cut into the mountain, making a path towards the entrance and I have began making the entrance to the cave room. I felt like the entrance should look more of a mine shaft then just this random entrance. I have re-designed the room to make it look like a mine shaft and less of a random hole in the ground.


As you can see, I am in the works of making a checkpoint area for the mine which is going to be the exploration room that the player can find in the map. I thought a wooden spiral stair case would fit the wooden theme that the mine will have. Down these stairs are going to lead to a tunnel that will guide the player in a small room which will contain one of the 10 notes.

I have had to hide all of these structures in the mountain. You can see the side finished layout of the cave system. Originally, Instead of the stairs, a ladder was going to be placed, but due to lack of time and knowledge, I decided to use stairs as it was easier to implement.

I encountered a bug when placing objects in the mountain. The rendering would glitch out and the objects wouldn't show. Turns out, my cliff edge that I did before the main blocking out was causing issues and had actually glitched the rendering for this map. I decided to make the cliff again but with less faces and edges.

I added a gate the player enters at the start and a few abandoned buildings which will be worked upon more when it comes to adding static meshes. I added these because I thought the map needed some more life to match the story. In the story, I stated that Mercy Park use to be half a city, so the characters needed to expect abandoned buildings in the park. Adding these buildings justifies the story and gives me a justified reason to add more to the map that the player can interact with.

BLOCKING OUT HAS BEEN FINISHED AND FINALIZED.
FINISHED DATE - 12/05/2019
NUMBER OF CRASHES - 1 (Unknown Crash - Unknown Cause)
Comments