

Texturing and Materials - Week 10 - 13/05 to 19/05
- Miles Carr
- Dec 24, 2018
- 5 min read
Updated: Jun 18, 2019
The Texturing phase should be easy enough to complete in a matter of a few days. This is only because once again, I am working with landscape painting like my last project with UE4. This makes environments easy to paint and texture, the only thing I need to do is grab the required textures needed to make my map colourful. I want to stick with the pixel planning and analyse the colours used. For example, green would be grass, the path would be dirt or mud etc.
I went ahead and grabbed all the necessary textures for the project online on a website called textures.com. This is a great website that allows you to grab 15 textures per day.

As you can see from this list, I went ahead and downloaded 6 textures that are needed for the landscape. Grass 1, Grass 2, Mud and Rock are going to be the textures used to paint the landscape.
In UE4s material builder, I will need to apply settings to make the painting aspect of the landscape work.
I used a useful tool that helps develop on textures making them stand out. It brings out the quality of the texture enough that when you are seeing the texture from the distance or even if you are nearby, it brings off this 2D/3D effect.
The tool I used is called CrazyBump which was already installed on the Mac I'm working from in college. Using Crazy Bump, I can save my textures in different formats. For example, in order for my texture to work and function in the material builder, I need the main image colour and image, and I then would need the Normal format of the texture which brings out the quality and the texture pattern.

After making all of my textures, I then need to import them into UE4 making sure I have them in a separate texture folder and to be sure they are all labelled to professional standards.

In order for me to paint over my landscape, I have to make a material which activates the painting mechanic for the landscape. I grabbed the Grass 1, Grass 2, Mud and Rock textures and made them into a landscape material.

All the possible textures that I need get placed in a layer blend node which defines different layers and platforms for the materials which helps with the painting tool. From my last project, I have learned and realized that I can only have up to 4 textures before the rendering stops working and it glitches my game. I then also have to initialize the layers so they work properly and paint as they should do without rendering issues.

I have now started the painting with the landscape tool using this Landscape Material.

Using the Erosion tool in the landscape tool section, I made the mountain less round and more sharp near the top. The water spots are the default ocean texture you get in UE4. I am using this because its already set up and animated for use. This will save me loads of time in the long run.
TESTING STATIC MESHES WITH TEXTURE PAINTING!
So I initially had the idea that the BPS brushes were going to be painted over so I can create dirt paths and grassy patches. But I was wrong when I came into an issue that would force me to scrap the idea and build up the mountain even more, making it flat so the player can walk on it.
To show what I mean by the BPS blocks, here is what I have had to change which has made a slight impact on texture development but nothing too drastic.
BEFORE:

The Purple blocks are the platforms the player would be running around on.
AFTER:

Those blocks are not there anymore, and as you can see, I have had to build up the terrain to match the same level as the BSP.
The main reason why the texture painting on BSPs were not working, would be because apparently, according to random online forum posts, you need to make the texture compatible with the Static Mesh Paint Tool. This would then mean I needed to convert the BSP into a static mesh to enable this tool.
Bug 1
When converting the BSPs to a static mesh, the collisions did not work at all. I had to figure out how to add the collision box myself, this was easy enough, but the collisions were glitchy and not smooth for the player at all.
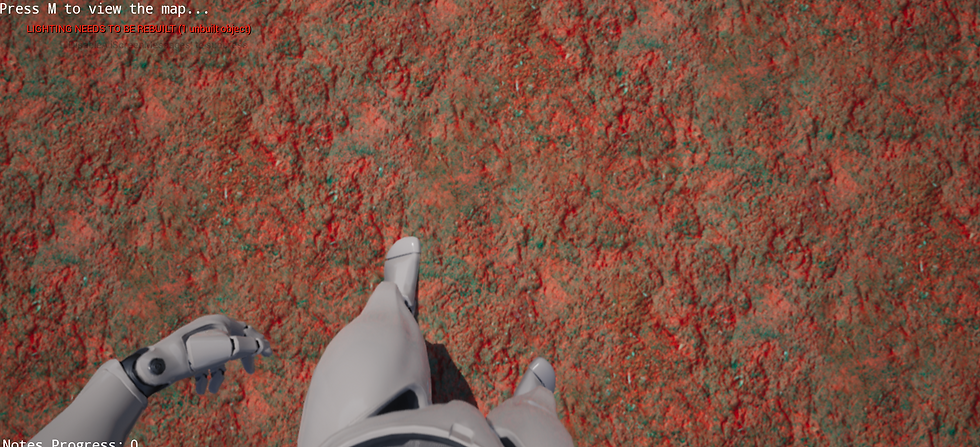
It's hard to see here, but I am actually hovering from the ground. In the editor, I could clearly see the collision box outline which was perfectly around the static mesh, but for some unknown reason, I encountered this issue of hovering. It's like the collisions are raised from the center, causing me to walk on air than the mesh itself.

As you can see from the green outline, there should not have been an issue.
Bug 2
The Textures didn't actually work at all, and because of this, I was unable to paint.
I created the material the way it should be done to enable painting, but for some reason, the paint tools had been deactivated, meaning I could not use them.

When I applied this material, I was left with a mixture of both textures, and not just one. Here is what was meant to happen. I would apply the material, and the two textures would work as a primary and secondary colour pallet. Primary being the Grass and Secondary being whatever I wanted the path to be. Instead, as stated, I was left with this strange mix of both.

So instead of it being bright green grass, I'm left with this pink/brown colour.
Here is the aftermath of the issue above.

This concludes the reason why I deleted the BSPs and decided to build up on my already existing mountain sitting under the player. The reason why this is an easier option, is because I already have the painting mechanics set up and ready to use, so I can easily paint my Muddy path without an issue.
Now that I can actually use the paint tool, I can make my paths to the different houses, cliff area and the murder zone. I also went ahead and changed the grass texture to a less brighter colour and to something more natural.
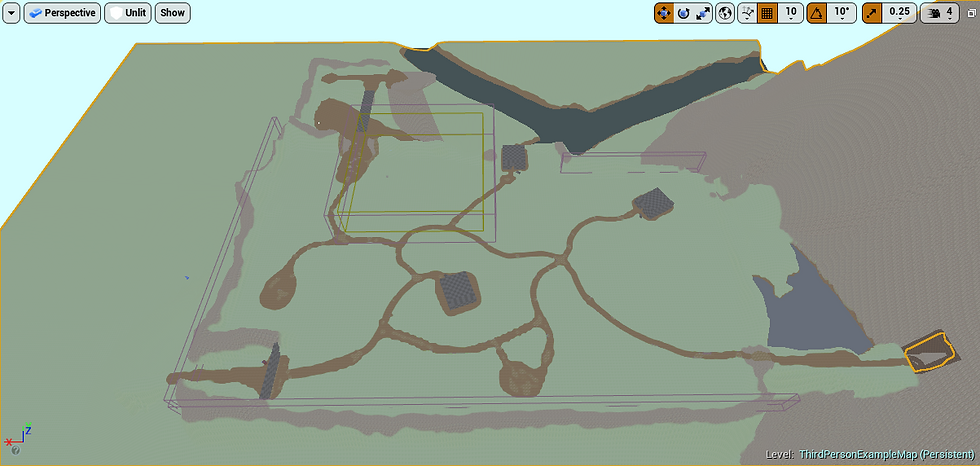
As you can see to the far right, I changed the grass texture on the big mountain to a rock texture, then at the top, I made a grassy patch. I took this as inspiration from my own previous project and previous research on UE4 mountains.

I have also extended the water to make the map look a lot larger than it actually is.
I researched how to make waterfalls in UE4 as it is a big part of the cliff area. There were a few methods that didn't work for me which was to make a particle system using materials online, and another which was to have a tool which is windows only. This would not be ideal for college use. I ended up downloading a waterfall BPS online along with some materials. I then watched a tutorial on how to make the water flow and animate. I then managed to create a waterfall. It's a bit different to what I imagined but it works very well.

You can also see at the bottom, I added a steam particle system which helps blend the two different water materials together, making it look like the water is crashing down in the river.
Here is what the blueprint looked like for the water fall. This was all followed from a tutorial on YouTube.

Before moving onto static meshes, I made sure to materialize the cave area. I gave the supports a wood texture. Some floors and roofs are rock textures. This is to make the cave look half dug out with some wooden supports and some exposed caving areas. It's meant to resemble a mining area so it doesn't look like some random cave in the middle of a park.


Now that I have finished the textures of the game, I can move onto adding effects and static meshes!
THE MATERIALS PHASE HAS BEEN FINISHED AND FINALIZED.
FINISHED DATE - 19/05/2019
NO CRASHES
Comments